Jan 25 2009
Flower Pot Pocket Card
Here’s the other project that we did this weekend. I saw Linda Heller’s video tutorial for a flower pot pocket card (she received one from Missy Shipman at the SU! Leadership Conference) and absolutely had to make one. I think this is my favorite card ever! Here’s my version of it…
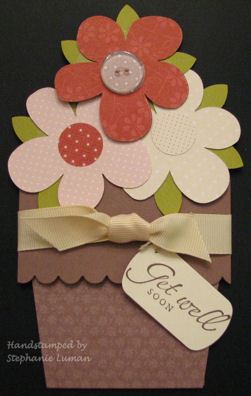
Stamps: Sincere Salutations, Curvy Verses
Paper: Whisper White, Close To Cocoa, Very Vanilla, Riding Hood Red, Pink Pirouette, Kiwi Kiss, Candy Lane Designer Series Paper
Ink: Chocolate Chip Classic Stampin Pad
Accessories: Big Shot, Build A Flower Bigz Die, Clear Buttons, Mini Glue Dots, Key Tab Punch, 3/4″ Circle Punch, Scallop Edge Punch, 5-Petal Flower Punch, Stampin’ Dimensionals, Very Vanilla 5/8″ Grosgrain Ribbon, Natural Hemp Twine
Technique: Pocket Card
Credits: Inspired by Linda Heller –> Missy Shipman.
Instructions:
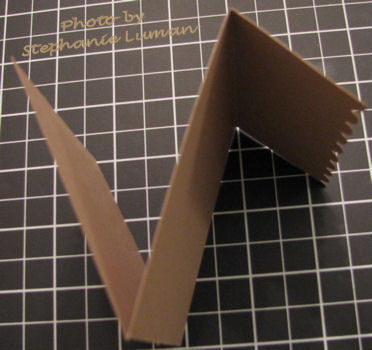
Flower pot: Cut Close To Cocoa cardstock 3-1/2″ x 9″. Score in landscape position at 2″ and 5-1/2″. Fold the 2″ section toward you and the 5-1/2″ section away from you. Trim the edge of the 2″ section with the Scallop Edge Punch. Here’s what the fold looks like from the side:
To make the front look like a pot, place it in SU’s portable paper trimmer with the front 2″ flap flipped up.
Line up the 2″ score line with the cutting track and the 5-1/2″ fold line with the 1/2″ mark on the trimmer as shown below:
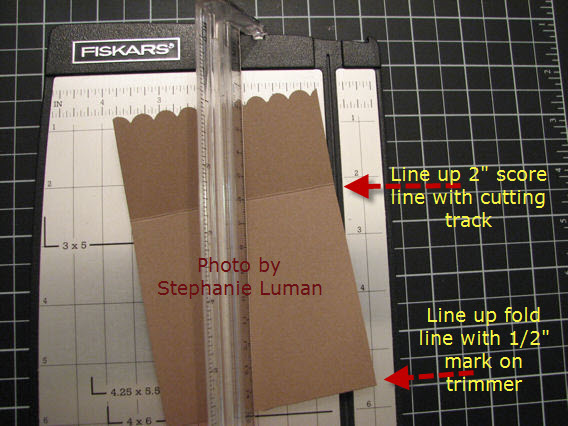
Flip down the cutting guide and cut. Flip the cardstock over and repeat.
Cut 3″ x 4″ piece of DSP for front of pot. Adhere to the front, flip over and trim both sides.
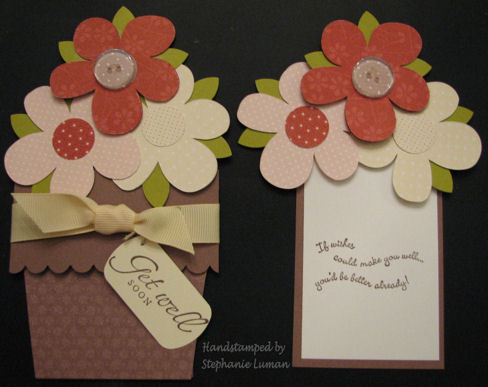
Vanilla ribbon is 14″. Place adhesive in center of ribbon and then attach to center upper back of flower pot and tie around.
Stamp sentiment on vanilla cardstock, punch out with Key Tab punch and attach to ribbon with twine.
Flowers: 2 layers, 1 DSP (3″ x 3″) and 1 cardstock. Attach a smidge of adhesive between squares of dsp and cardstock before running thru the Big Shot to keep them together. Leaves are Kiwi Kiss cardstock punched with 5-Petal Flower punch and then cut apart. Attach the leaves to the dsp flower by slightly pulling back the dsp and adhering them behind it.
Flower w/ button: Punch out 3/4″ DSP circle, attach to clear button with glue dot, attach button to flower with glue dot.
Use dimensionals to attach flowers to the top of pull out card.
Pull Out Card: Cut Close To Cocoa cardstock 2-1/2″ x 4-1/2″. Cut White cardstock 2-1/4″ x 4-1/4″.
————————-
In response to comments and emails:
- I’ve added a side view of the flower pot folds.
- If your careful of the placement of the flowers and how “tall” the bouquet is, this will fit in a standard A2 envelope.
- There isn’t any adhesive on the flower pot…the ribbon is the only thing holding it together.
Thank you for all your wonderful comments!
141 responses so far


Fabulous!! Thanks for the tutorial!!
This is really wonderful- love it!! Thank you for sharing this.
Such a cute card … love everything about it. Thanks for sharing how you made it.
Wow to the gazillionth power! baba bum baba–I’m lovin’ it!
Thank you for the inspiration most creative one 🙂
Super cute! Definitely need to try this idea!
WOW! I love this card! My new favorite! I want to make a bunch of them! I’m wondering if they fit in a standard A@ envie. Also, I would love to see some other things you have done with the Build a Flower Die- I’m going to have to get it! Thanks for sharing and inspiring!
That would be standerd A2 envie!
super sweet! great tutorial! thank-you so much!
I tried to leave the following comment on SCS for you on this card, but the system said it was a duplicate message??? and wouldn’t let me add it. So here you go!
“This should be submitted to all the contests! SU, Cards magazine, Creating Keepsakes–every one. A-D-O-R-A-B-L-E!”
Thanks for the instructions.
LOVE this! I am definitely trying one! Thanks so much for sharing how you made it!
FAbulous! thanks for sharing!!!
I LOVE this card. What is Linda Heller’s blog name?
This is the cutest thing I’ve ever seen! This is awesome!
very cute. thank you for sharing.
wonderful idea thanks for the tutorial~
I attend a stamp club and of all times I was sick and unable to attend. Our hostess gives us the pictures even if we can’t attend, so thank goodness I was able to see this card. I love it! It is such a fun card. Thanks for sharing. By the way she did give you the proper credit or I wouldn’t have been able to find the directions. Thank you and keep up the inspiring work. Jennie in Phoenix.
[…] gave my Mom one of my flower pot cards and this is the card I made for my […]
These are so cute! I’ll have to try some!
I love this flower pot. I’m gonna have to try one.
Adorable…and so clever!
This is great! I have my 3rd project for my monthly class! TFS!!
This is terrific. Thanks so much for the awesome tutorial. I have lots of floral punches so this should be a fun project. TFS
What a wonderful tutorial! Love your project!
This looks like somethiong I definitely want to try. I have some homemade seed paper that I will try to incorporate. Thanks for the info.
Thank you so much. That is one of the best tutorials that I have seen explained in a long time.
I loved it. I’m really into the punches.
I would like to leave a comment, but I don’t understand what you want at the website
Please help!
Great idea for Mother’s Day or any spring occasion. TFS. Great tutorial.
[…] this cute little flower pot card! Today’s Technique Lovers Challenge included a tutorial by Stephanie Luman for this card sketch and I had so much fun “picking my bouquet” for my design. I admit I […]
Wow! great card! I followed a link from grace’s blog. I’m looking forward to making this myself. Thanks for a great tut!
Beautiful card and tutorial! I am off to play along…. Jennifer 🙂
Wow I can’t wait to try this..Absolutely gorgeous and fun!!
Oh I played in the Monday Challenge on Splitcoast. This is a great little card, thanks for sharing and putting in the tutorial. Candice 😉
This is so cute! Thanks so much for the wonderful directions!!!! 🙂
This is absolutely adorable. Nice job!!
Stephanie, such a cute card. It’s SPRING, so it makes what to make this card. I’ve actually make to for Mother’s Day. Thanks for sharing!!
Thank youfor this darling and well done tutorial!
This is just wonderful, thanks so much for sharing!
[…] found a great tutorial for a Flower Pot Pocket Card here posted by Stephanie Luman. This is a great tutorial and the card is very simple to […]
Gorgeous card and great instructions. I will be having a go with this soon hopefully.
So very cute! Love the card.
Ter 🙂
[…] Funny thing is I made it before it was a technique challenge on SCS. I found great directions here http://sluman.blogs.splitcoaststampers.com/2009/01/25/flower-pot-pocket-card/ I modified my version slightly as I wanted to have a larger insert for writing on. All supplies are […]
This card is AWESOME i LOVE LOVE LOVE IT! Gonna try and make it for my next show! Thanks for sharing! 🙂
Our demo cased this and we made it at SAS. It was a hugh hit. Thanks for shareing.
Reina Moore Carthage MO
Thanks for sharing ! It was fun to make! Made one for a friend who loves flowers.
I am sure she will love the card!!
[…] I came across directions for this adorable pocket card here. […]
Oh my stars and garters what a lovely tutorial. OMG I’m so going to make one of these. Thanks for sharing. ♥Dawn♥
soooo cute, thanks for sharing!
Hi Stephanie, thanks so much for sharing your card, I had so much fun making it for my friend
enjoy the spring,
Ginny
[…] tutorial is in my other post, here. I have a three day weekend coming up and am hoping I can get lots of stamping done. I really want […]
not sure if I understand your third picture (put 2″ at cutting track, and the fold at 1/2″????
Your card is fantastic!!!
Pam
great card i am going to try and make thanks for the information
jane
Hi!
Am I the only one to be confused by the measurements as written above? I followed them exactly and frankly it did not work. I believe the cs should be 3 1/2 by 11 and score at 2 and 6 1/2.
Fablulous idea and tutorial!!
Beautiful card and excellent tutorial, TFS.
Fabulous and thanks for sharing! Great Mother’s Day card or Get Well or just thinking of you!
Love the card. Thanks for turtorial. Ive heard others mention the flower pot card and was excited you posted the directions. Thanks again.
Thank you so much for sharing your wonderful instructions on how to make this adorable card. I made one last night.
Thank you I have been desperately seeking this tutorial!
Blessings to you!
Great tutorial! Looking forward to making bunches of these for Get Well and Birthdays!! Thanks so much.
[…] if you make one of these, please check your envelope size!! Tutorial for this flower pot is found here on SCS by Stephanie Luman. Good job […]
LOVE IT!!!!
This tutorial is awesome, thank you for sharing it. Using this as invitations for my mother’s surprise birthday party.
[…] card stock with the polka dots to add to their centers. I followed the pattern for making the card here. I really like how easy this card was to […]
Love this card, thank you so much for the pattern
Thank you! thank you! thank you! can hardly wait to try this.
Thanks! This will be my 3-D for Stamp Club for Mother’s Day! Giving you the credit and linking to your website. Thanks again SU! Sister!
Hey there!
Such a wonderful card!
You did it very impressive…Thank you!!
But I have one question:
I’m a amateur 🙂 and I don’t really understand the size that stands there…
(for example: 3-1/2″ – the quotes…)
Can somebody explain me that a little bit?
Thank you!
Bye for now…Lilli!
Hi Lilli!
The quotes stand for inches. For example 3-1/2″ would be 3.5 inches or
8.9 centimeters (cm) in metric.
Just made up my CASE. I’m cheap when it comes to making the most out of my paper for clubs and camps so I altered the dimensions to 3 1/2″ by 8 1/2″ for 3 from an 8 1/2″ by 11″ sheet. Then I scored at 1 1/2 instead of 2 and 5 (or 3 1/2 from the opposite end). Using the 5-petal and boho blossom punches for more but smaller flowers, the front dimension was fine.
Thanks again!
Hi, found your tutortial on the Flower Pot Card, just completed one it is so darn cute. Thank you for sharing. I’m in a card club and was wondering if I could CASE this idea and instructions for the club? I will certainly give you the credit for the card but wanted to ask first.
Diane
[…] April 28, 2009 by Yapha I’ve been seeing the cutest flower pot cards all over the card making blogs lately, and I just had to try it! It is so perfect for Mother’s day! All of the instructions can be found on Stephanie Luman’s blog. […]
Thank you for this awesome tutorial. Going to give this a try a bit later today!
Thanks so much for the awesome tutorial. I love this card.
Thank you for the tutorial. I have just made one and I love it’s simplicity and versitility. I have seen so many of them on Split Coasters so it was good to try one.
love the card, recommended by my upline. using it as a mothers day card for a grade 2 class that i will be ‘teaching’ in. (teacher is is my stamp club…so excited!)
Stephanie,
Thank you so much for sharing the workings and makings of this beautiful card. Just made a set of 6 as a Birthday gift. Thank you.
thank you for sharing your talent. i love it. i will try tomarrow to make it. thank you again
Thank you for the tutorial. Adorable!!!
WOW at last I have found directions!!
I have wanted to make this and did not plan on buying the big shot!!
THANK YOU so very much for sharing the wonderful directions!!
Scrappy
Wonderful cards! Thanks for sharing the directions!
[…] The sample I’m showing you is PERFECT FOR MOTHER’S DAY or some special lady! It’s a flower-pot card….isn’t it adorable?! This is one of the projects we made in my stamper’s club last month. If you want directions, click here. […]
Beautiful! Thanks for the tutorial!
WOW,this is clever! Can’t wait to try it.
I made some of these from your tutorial and linked up your blog. Thanks for making these…they are addicting!
Stephanie thanks for the AWESOME tutorial! I can’t wait to make one of these for my mom for mother’s day!
Hugs~ Kim
[…] Ett blomkrukekort – beskrivning […]
Cute, Cute, Cute!
Stephanie,
Your flower pot card is adorable. I found your blog through Dawn’s video. Both your instructions and her video of this project are so easy to follow.
Thanks for sharing,
Lori
I made this with my club last night for Mother’s Day. It was a HUGE hit! Definitely a WOW! project! Thanks you so much for sharing and making the directions so easy to follow! Love it!!
Hi Stephanie, just discovered your blog via Dawn’ s website. Love your work. I am browsing through your work. Love, love love them all. Thanks for sharing.
Hi, Stephanie! Just wanted to express how I love your flower pot card. I couldn’t resist creating my take on it for Mother’s Day. My mom would love it as well as I do. She’s a green thumb too. Thanks again for sharing your instructions 🙂
Thank you so much for this tutorial! I’m so glad I found this and your site!
Thanks for giving all the dimensions! I finally made one of these today and posted it on my blog – thanks for the inspiration!!
Truely fun all away around it! Fun to look at, fun to make and such great directions. You have planted the seed to a paper flower garden that is growing wild around the world. Thanks for sharing this wonderful card.
THis is a great card. Thank you for sharing it and allowing Dawn to make a video. I will be making many of these and I am sure my girls will have fun with them too.
Love it! What a great card! So many possibilities! Thanks for sharing!
Thanks so much for your great tutorial and for allowing Dawn to use your tutorial for her video!!! What an impressive card to have someone open!!! Thanks again!!!
Love this Card! It breaks away from just a card and creates interest! We need more of this type. Thanks!!!
Wow. thank you for sharing your tallent! I know of a special lady that is going to get this card! Thank you again!
Thank you so much for sharing. Great instructions. Just been to Conference in Australia and had demos cards of these. Now we can make them.
Lovely card. Thanks again. Cheryl
This card is so cute !!! Thank you for sharing from Ageeth from Holland
Wow, oh, WOW… A long ist of who made this and I just happened upon it from Dawn’s blog and she sent us here…It is just the coolest idea and I gotta make a few myself! TFS!!
[…] the way it turned out! If you’d like to know how to make it, Stephanie Luman did a fabulous tutorial be sure to check it […]
Well I made one. I just wanted to post a link for you to see.
http://livelaughscrap-leedle.blogspot.com/2009/05/flower-pot-card.html
Thanks for the instructions.
Lori
What a wonderful card,loved it,I just made one,yippe,and am going to make more and give them to my church family.Thank You for a wonderful card that I could actually make.Thank You again and God bless you for sharing your wonderful gift,talent from God and for sharing and teaching us.
Lea Kiefer
[email protected]
[…] I decided to make my own mother a flower pot card. I got my instructions from Stephanie Luman’s blog who gives original props to Linda Heller and Missy Shipman. I believe Linda is the […]
Awesome card and thanks for taking the time to share clear directions!
[…] Note: Robin took inspiration from this original project by Stephanie Luman: http://sluman.blogs.splitcoaststampers.com/2009/01/25/flower-pot-pocket-card/ […]
LOVE this!!!
Oh this is just adorable and thanks so much for the instructions!
I’m off to try and make one, wish me luck!
Hugs!
Thank you for sharing this! My friend Theresa gave me a “class” on how to make these thanks to your instructions and we’re both hooked! They are adorable–and so easy to do! Blessings, Sharon
Thankyou for the tutorial Stephanie most helpful
[…] the place. I was checking out a few of the many samples posted and came across a tutorial on Stephanie Luman’s Blog. As I was reading through her great tutorial, I was suddenly hit by a thought – what if, rather […]
[…] for this flowerpot pocket card can be found on Stephanie Luman’s […]
[…] http://sluman.blogs.splitcoaststampers.com/2009/01/25/flower-pot-pocket-card/ […]
[…] swap I joined. If you would like the tutorial for the flower pot pocket card, you can find it HERE. You will find a very clear description of how to get your flower pot folded and trimmed up by […]
Thanks again for the great tutorial. I’ve linked your post to a post on my blog. Thanks!
What kind of adhesive do you use? Do you recommend any special glue?
Thanks for the tutoral, i plan to try it
Your card is so adorable.
Thanks for taking the time to demonstrate and share. I made this and it’s great. Thanks so much.
[…] pot. card I came across directions of how to make this adorable flower pot card here. I wanted to do it myself, it’s so cute and really fun to make especially when you create […]
Stephanie – that is a great card you have very kindly shared with us all.
[…] wondering what to create this month for the make-n-take. I cam across this great tutorial for a Flower Pocket Card on Stephanie Luman’s […]
Can’t wait to give this card a try! PERFECT! 🙂
[…] Day cards!! (No peking mom and mom-in-law!!) I got the cutting directions from this site http://sluman.blogs.splitcoaststampers.com/2009/01/25/flower-pot-pocket-card/. It was pretty easy to assemble. I think the hardest part was decorating it and finding what […]
Thanks so much for the flower pot tutorial they are adorable. The ideas are limitless. Great project
xxx
Fantastic cards. Love your blog really and the tutorial. Through this tutorial i can learn easily. So i must take a try.
Thanks for your share! very impressive!
I bought a guillotine paper trimmer and scissors just so I could try this. It’s a shame I can’t post a picture because, if I say so, very pleased with how it turned out. Thanks!
Great tutorial! I love these cards they are so cute!
[…] machen, die seit Wochen überall im Netz herum geistert. Als Unterstützung habe ich mir diese Anleitung von Stephanie heraus gesucht und kam auch super damit klar – bis ich von all meinen Blümchen und der Suche […]
Beautiful flowerpot design here..I like your lovely work..Thanks !!
Found you website via digg I must say I m amazed with your articles!
I found your blog when looking for the FLOWER POT instructions ! I am a little behind the times, wanting to make these type of cards NOW instead of when they were extremelly popular ! I am making them for the Winter holidays…..with “pionsiettas ” I think this will be a great card to cheer someone up !
Thanks so much for sharing !
[…] this month. I CASED the pattern that I found on Stephanie Luman’s blog, which can be found HERE. This would work well for a Mother’s Day […]
Your flower pot card is so sweet and lovely! I adapted the project to cut using my Silhouette. It turned out beautiful!
Chrisboldo sent me this way! I loved her version of this. Yours is very pretty too-and so clever! 🙂 Thank you for the tutorial! 🙂
I love this style of card! I wanna try to make one. TFS! I didn’t see a link to become a follower, but I commented on your “Happy Birthday” card on Card Making-USA & will find the link there again. <3